How To Hide Your WordPress Login

Posted on April 27th, 2018 by Jean

After receiving several alerts today that “user locked out from signing in”, I decided to hide my wordpress login page. I had successfully utilized this method of hiding my login page years ago on my business site, but could not find the directions today when I so desperately needed them.

A quick review of 2 key wordpress files allowed me to figure out how to proceed. There are plugins out there to hide your login, but this is the method used through your cpanel.

PART ONE

Log in to your cpanel account

Choose File Manager from the Files Section

Under “settings” (upper right corner), select “Show Hidden Files”

In your home file, look for .htaccess

Highlight .htaccess and click EDIT from your top tool bar

A text editor notice appears. Click EDIT to proceed

After text in this file, input the following

ErrorDocument 401 “Unauthorized Access”
ErrorDocument 403 “Forbidden”
<FilesMatch “wp-login.php”>
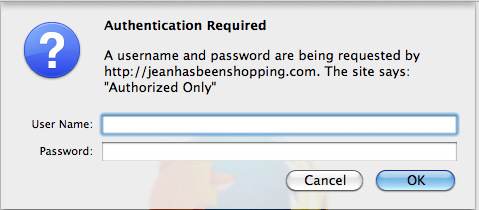
AuthName “Authorized Only”
AuthType Basic
AuthUserFile /home/yourdirectory/.wpadmin
require valid-user
</FilesMatch>
<Files 403.shtml>
order allow,deny
allow from all
</Files>

Insert your directory name (noted in red above). It will show you at the top of the page, CURRENTLY EDITING HOME/______/

You can also enter IP addresses you’d like to block. They would be entered after </files>

Example:

deny from 77.92.73.102
deny from 66.147.244.109
deny from 208.117.46.9

And so on. My list of blocked IPs is quite long.

Hit SAVE

PART TWO

Now you have to create the .wpadmin file.

Click on the top file in the tree on the left of your cpanel. It should say home/_____ <— your directory

Click on NEW FILE (top left of the tool bar)

Name the file .wpadmin

Highlight the file and choose EDIT

A text-editor warning appears, click EDIT and GO

In this file, you need to add a code that is generated here.

Using the online .htpasswd generator, choose your user name and password. These do NOT have to match your WordPress login.

Copy the code that is generated, and paste it into your new .wpadmin file. SAVE

You’re done!

When you try to access your login page, you will now be greeted with a new window asking for your authorized user name and password.

The Hole In Your WordPress Site

Posted on June 17th, 2014 by Jean

If you have a self-hosted wordpress website, chances are that you have a hole in your site. A hole that allows others unrestricted access to your jpg, pdf and movie files.

To find out, type in your wordpress site followed by /wp-content/uploads

Do you see what I see?

wordpress files exposed

Those are your uploads divided by year. Inside of each year, your uploads are divided by month. And I, or anyone, have access.

I stumbled upon this by accident, accessing the motherload of a file of which I cannot divulge. When I looked at my browser bar, I saw the website’s address followed by /wp-content/uploads

When the realization hit me that MY wordpress files were ALSO vulnerable, I dove into action, finding a way to block access yet still allowing my site to function. What we are striving to do here is have a 403 page pop up telling the web server that access is forbidden.

I found the solution to be very simple. We need to type options -indexes to the bottom of our .htaccess file. Your .htaccess file is in the root directory of your website. You will need to access your ftp files through your website host.

Step 1: Log into your cpanel at your hosting site. It can be https: followed by your site name and then /cpanel

cpanel log in

STEPS 1, 2 AND 3

Step 2: Choose “File Manager”

Step 3: Choose “Home Directory” and check “Show Hidden Files”

Step 4: From your Home Directory, type .htaccess in your search toolbar

edit your htacess file

STEPS 4, 5 AND 6

Step 5: When .htaccess file appears in search results, double click to choose it.

Step 6: Select .htaccess from the list that appears. (For some reason I can never see the .htaccess file prior to searching for it.)

Edit your htaccess file in cpanel

FINAL STEPS – 7, 8 AND 9


STEP 7: With your .htaccess file selected, choose “Code Editor” from your toolbar menu.

STEP 8: Leave the default settings on the pane which opens, and select “Edit”.

STEP 9: Add Options -Indexes to the last line, and SAVE FILE.

You are done. Go ahead, try to access your site/wp-content/uploads. Do you see a big red 403 message? I do!

403 Forbidden

If you have ANY trouble with this, let me know. I’d be more than happy to help.

Pixlr | Free Online Photo Editor

Posted on October 16th, 2013 by Jean

This is a fun tutorial to show how to use Pixlr Express, a free online photo editor. It can give your photos a fresh, unique look. I use it to create collages.

Pixlr Collage by Jean photo JeanPixlrcollage_zps2b6efa54.jpg

The steps are easy.

1. Visit Pixlr Express and “click” Collage. Choose Layout, upload your photos and begin editing.

Pixlr Tutorial

2. To apply different effects to each photo, click on the paintbrush at the top of each photo. Apply effects, then save to return to the collage.

Pixlr Tutorial step 2

3. To apply the same effect to all of the photos, choose finished. Then apply effects.

Pixlr Tutorial step 3

Edit options include Adjustment, Effect, Overlay, Border, Sticker, and Text. Select each one to see your choices. With Adjustment, you can rotate, crop, lighten, etc. Effects contain the filters. Overlays are bursts of images.

Pixlr Effects

When finished, save to your computer.

Pixlr Tutorial save

My edits in the top collage were as follows:
Top Left = Jenna Sue Text
Top Right = Hagrid Effect
Bottom Left = Satya, Gram, Helena and Hans Effects
Bottom Right = Tom and Ingrid Effects, bronze and Roger Overlays

PJ ART

Here’s one my daughter made! Now I’m holding a pop-tart while a monkey plays on the lawn. Super sweet!

Pixlr Express is also available to download for FREE to your iPad or iPhone.

Give it a try, and share your results!

Menu

  • [instagram-feed]
  • Enter your email address:

    Delivered by FeedBurner

     
    Follow on Bloglovin

  • SPONSORS


    Stock Photos & Images

© 2014 JEAN HAS BEEN SHOPPING. ALL RIGHTS RESERVED.